Full Details
TG Mirror Leech Bot
Branch: master
https://github.com/priiiiyo/tg-mirror-leech-bot
Heroku Deploy
Important Notes
- This Branch only for deploying, generate all your private files from master branch.
- Use this branch to avoid suspension
ORdeploy master branch twice with same app name (check helper.sh for help). To stay up to date don't fillUPSTREAM_REPO, on eachdyno restartyou will get lastest commits from official repository or fillUPSTREAM_REPOby your public/private fork link and fetch manually then you can update your bot byrestart cmdanddyno restart. - Don't delete .gitignore file.
- Read all variables definitions from master branch readme.
- Keep the programmer inside you away and follow the steps.
With CLI
- Clone this repo:
git clone https://github.com/priiiiyo/mirror-leech-bot mirrorbot/ && cd mirrorbot- Switch to heroku branch
- NOTE: Don't commit changes in master branch. If you have committed your changes in master branch and after that you switched to heroku branch, the new added files will
NOTappear in heroku branch.
- NOTE: Don't commit changes in master branch. If you have committed your changes in master branch and after that you switched to heroku branch, the new added files will
git checkout heroku- After adding your private data
git add . -f- Commit your changes
git commit -m token- Login to heroku
heroku login- Create heroku app
heroku create --region us YOURAPPNAME- Add remote
heroku git:remote -a YOURAPPNAME- Create container
heroku stack:set container- Push to heroku
git push heroku heroku:master -fExtras
- To delete the app
heroku apps:destroy YOURAPPNAME- To restart dyno
heroku ps:scale web=0heroku ps:scale web=1- To set heroku variable
heroku config:set VARNAME=VARTEXT- To get live logs
heroku logs -tWith Github Workflow
- Go to Repository Settings -> Secrets
Add the below Required Variables one by one by clicking New Repository Secret every time.
- HEROKU_EMAIL: Heroku Account Email Id in which the above app will be deployed
- HEROKU_API_KEY: Your Heroku API key, get it from https://dashboard.heroku.com/account
- HEROKU_APP_NAME: Your Heroku app name, Name Must be unique
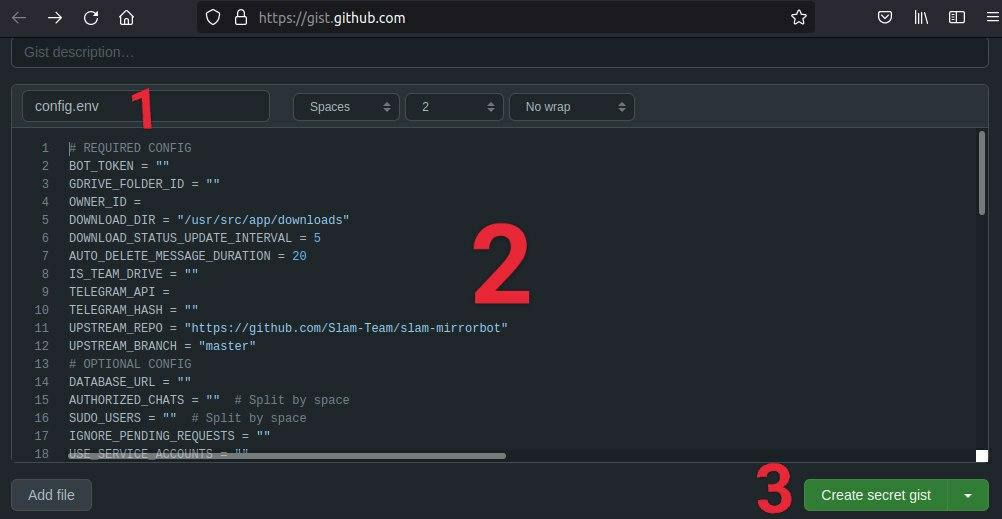
- CONFIG_FILE_URL: Copy This in any text editor.Remove the REMOVE_THIS_LINE=True line and fill the variables. For details about config you can see Here. Go to https://gist.github.com and paste your config data. Rename the file to config.env then create secret gist. Click on Raw, copy the link. This will be your CONFIG_FILE_URL. Refer to below images for clarity.
Remove commit id from raw link to be able to change variables without updating the CONFIG_FILE_URL in secrets. Should be in this form: https://gist.githubusercontent.com/username/gist-id/raw/config.env
After: https://gist.githubusercontent.com/iamSMMH/9cce4a4b4e7f4ea47e948b2d058e52ac/raw/config.env
You only need to restart your bot after editing config.env Gist secret.
After adding all the above Required Variables go to Github Actions tab in your repository.
- Select Manually Deploy to Heroku workflow as shown below:
- Then click on Run workflow
NOTE: Don't edit variables from Heroku, if you want to edit simply do it in config.env from your gist, after it just restart your app.


